

In many people’s minds, a broom is the signature prop of a witch—flying across the night sky on one, or leaning behind the door as decoration. But in actual natural magic traditions, a broom is first and foremost a practical tool. Its purpose is specific: to clear stagnant, heavy, unwanted energy from a space.
We have all experienced this: you walk into a room and something feels off, though you cannot say exactly what. Maybe there was an argument there earlier. Maybe the layout of the room keeps the air from flowing. Maybe it has simply been too long since the windows were opened, and the energy has grown cloudy. Physical cleaning can remove the dust, but the layer beneath the dust needs a different approach.
Broom cleansing is one such approach. This article covers two things clearly: how to cleanse a space with a broom, and how to make your own broom by hand.

Why a Broom?
The symbolism of the broom is very direct: it clears away what is not needed. This action works on two levels at once—you sweep dust from the floor, and at the same time you sweep away lingering emotional residue and stagnant energy in the air.
In green witch tradition, brooms are usually made from natural materials, especially birch twigs. Birch is traditionally associated with purification, protection, and banishing, which makes it a first choice for a cleansing broom. Other woods with tough, fine twigs can also be used, such as willow, hazel, or alternatives to birch.
One important point: do not use your cleansing broom for household cleaning. Do not use it to sweep cookie crumbs off the kitchen floor or leaves off the balcony. This broom is a tool dedicated to energy work. Keeping it “dedicated” is itself a form of respect, and it keeps the broom’s energy pure.

The Steps of Broom Cleansing
This method works for any room and can be done at any time. No complicated tools are needed—just a broom and a few quiet minutes.
Step one: Stand in the center of the room. Hold the broom handle with both hands and take three slow, deep breaths. As you inhale, imagine fresh energy entering your body. As you exhale, release distractions and tension. Settle yourself and prepare to begin.
Step two: Begin sweeping. Hold the broom about an inch above the floor. Do not actually touch the floor. You are sweeping energy, not dust. Start from the right side of the room and sweep toward the left. Move slowly and with awareness. Feel the subtle air current the broom creates as it passes through the space.
Step three: Spiral counterclockwise. Keep sweeping while slowly turning to your left, using yourself as the center point. This is a counterclockwise spiral path, traditionally associated with breaking up, dispersing, and clearing. As you turn and sweep, visualize the stagnant energy in the room being stirred up, the heavy parts broken apart, and the flow restored. See the murky energy change from dull to bright and clear.
Step four: End at the door. Continue the counterclockwise spiral, gradually widening the circle until you reach the door of the room. Stop at the doorway and point the broom outward. Visualize all the energy you have swept up leaving the space and dispersing into the air.
Step five: Close. If you like, say a short statement at the end, such as: “Bright energy flows through my home. This room is cleansed.” Then put the broom away in its fixed place.
The whole process does not need to take more than five minutes. What matters is not the length of time but the awareness in the action—whether you are truly visualizing the flow of energy, truly feeling the change in the space.
When to Cleanse
There are several clear signals that it is time to clean the energy:
- After an argument, conflict, or emotionally intense conversation in the room
- After a party or after many guests have been in the home
- Before moving into a new place, or after rearranging furniture
- When a room feels “stuffy,” “heavy,” or “hard to stay in”
- At seasonal transitions, especially from winter into spring
- As regular maintenance, such as once a month
You do not need to wait until things feel terrible. Just like physical cleaning, regular maintenance is more effective than one big cleanup.

Making Your Own Broom
Natural brooms are getting harder to find, especially in cities. But making one yourself is not difficult, and the process itself has meaning—from the moment you choose the materials, you are building a connection with natural energy.
Materials:
- One sturdy stick, about 1.5 meters long and 2 to 3 centimeters in diameter (for the handle)
- Thin twigs, about 45 centimeters long and no more than 1 centimeter thick (enough to make a bundle about 7 to 8 centimeters in diameter)
- Wood glue
- Four finishing nails
- A leather strip or strong cotton cord, about 1.5 meters long and at least 1 centimeter wide
- Sandpaper
- Newspaper
Steps:
1. Prepare your workspace. Spread newspaper on the floor to protect it from glue.
2. Prepare the handle. Decide which end of the stick will be the top of the handle and which end will be the binding end of the broom. If the stick has bark, decide whether to keep it. Sand the top end to make sure there are no sharp edges or splinters.
3. Sort the twigs. Spread out the thin twigs and cut or break off any that stick out at odd angles. Trim all twigs to roughly 45 centimeters long.
4. Attach the first twig. Take one of the thicker twigs and place it against the bottom of the handle. Overlap the twig and the handle by about 12 to 15 centimeters. Apply wood glue along the overlapping section and press the twig firmly against the handle. Lay one end of the leather strip across the twig and add a drop of glue to secure it. Holding everything firmly together, hammer one finishing nail through the leather strip and the twig into the handle.
5. Begin wrapping. Spread a thin layer of glue around the bottom 12 centimeters of the handle and start adding more twigs. Each twig should overlap the bottom of the handle by about 12 to 15 centimeters. Place the second twig over the leather strip, then the next twig under it, alternating as you go. Keep the tension on the leather strip consistent.
6. Keep adding. When you come back around to the first twig, apply more glue along the top of the first layer of twigs and continue adding a second layer. When you reach the halfway point of the second layer, pull the leather tight and hammer in a second finishing nail through the twigs into the handle below. Continue adding twigs.
7. Adjust the thickness. Keep adding twigs, applying more glue along the tops of the twigs as you begin each new layer, and winding the leather over and under the twigs. When you are satisfied with the thickness of the broom head, or when you run out of twigs, hammer in a third finishing nail to secure it. Apply glue to the inside of the remaining leather strip and wrap it tightly around the twigs. Secure the end with a final drop of glue and the last nail.
8. Dry. Lay the broom flat on a table or floor (do not hang it) for at least thirty-six hours, until the glue is completely dry.
9. Decorate (optional). If you like, you can wrap leather around the handle, add feathers or shells, or carve the wood. Do this after the glue is dry.
10. Empower. Before using your new broom for the first time, hold it in your hands and visualize a sparkling white light glowing around it. See this energy being absorbed into the broom. If you wish, you can further bless it with the four elements (earth, air, fire, water).
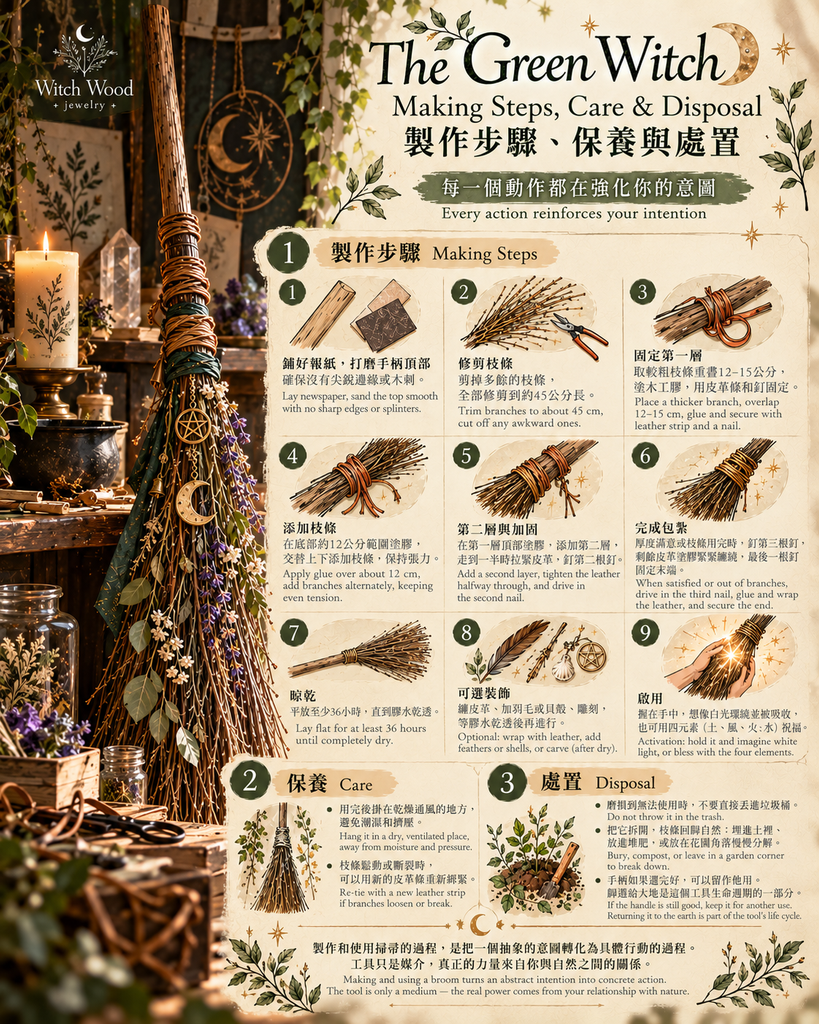
Care and Disposal
Care. After use, do not leave the broom lying on the floor. Hang it in a dry, well-ventilated place, away from moisture and pressure. If the twigs begin to loosen or break, you can re-bind them with a new leather strip.
Disposal. When the broom is worn out beyond use, do not throw it straight into the trash. Take it apart and return the twigs to nature—bury them in the soil, add them to compost, or leave them in a corner of the garden to break down slowly. If the handle is still in good condition, it can be kept for other uses. The act of returning it to the earth is itself part of the tool’s life cycle.
The process of making and using a broom is the process of turning an abstract intention (“I want to clear the energy of this space”) into concrete action. You choose the twigs, wrap the leather, hammer in the nails—every action reinforces the intention. When you first sweep the room with this broom you made with your own hands, the connection is real. It comes from your hands, and it comes from the twigs that once grew on a tree.
This is the heart of natural magic: not an outward plea, but an inward connection. The tool is only a medium. The real power comes from your relationship with nature.
References
- Murphy-Hiscock, A. (2006). The way of the green witch: Rituals, spells, and practices to bring you back to nature. Provenance Press.
- Cunningham, S. (2000). Cunningham’s encyclopedia of magical herbs (2nd ed.). Llewellyn Publications.
- Green, M. (2002). Wild witchcraft: A guide to natural, herbal and earth magic. Thorsons.
- Beyerl, P. (1998). A compendium of herbal magick. Phoenix Publishing.
- Cowan, E. (1995). Plant spirit medicine. Swan, Raven & Company.

